
How to Make a Tin Can Wood Gas Backpacking Stove
MYOG Tin Can Backpacking Stove Guide

Todays MYOG project is an ultralight backpacking wood gas stove that can be made with a few leftover tin cans and fueled with pinecones and twigs. A wood gas stove is designed in a way that cool air enters from the bottom and is heated as it channels towards the top and mixes with gases from the combustion and ignites them, to create a super efficient burn. And one of the best parts of this design is you never have to worry about packing fuel because you can find twigs, pinecones, and other fuel anywhere.
Video Overview of the Tin Can Wood Gas Backpacking Stove
Needed Tools and Materials

- Campbell's Chunky Soup Can
- Campbell's Condensed Soup Can
- Dole Pineapple Can
- Measuring Tape
- Drill and Bits
- Tin Snips or Jig Saw
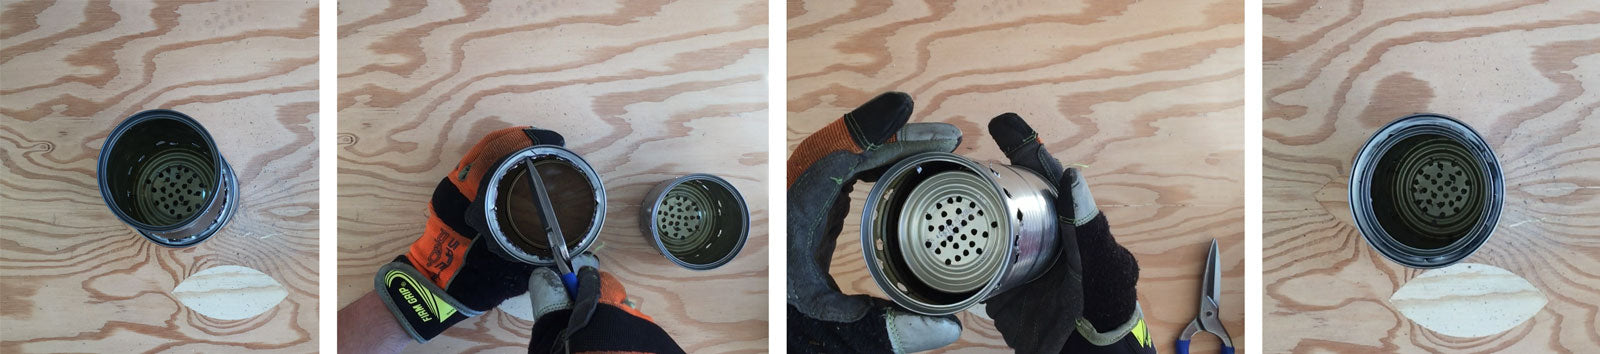
Step 1: Cutout a Hole in the Bottom of the Large Can
Empty and clean the three cans. Trace the small can on the bottom of the large can. Drill a Hole in the bottom of the large can as a starting point for cutting out the traced circle with either tin snips or a jigsaw.
Caution: Use care when using tools and be careful of sharp edges on the cans.

Step 2: Measure and Drill 2 Rows of Air Holes Around the Large Can
Measure and mark every inch around the top of the large can. Then use a small drill bit to make 2 rows of pilot holes around the top of the can. Offset the second row so that the holes are in between the holes of the first row. Next, use a large drill bit and enlarge each pilot hole.

Step 3: Measure and Drill 3 Rows of Air Holes in the Small Can
Repeat the same process for the small can, making 2 rows of air holes along the bottom of the can and a single row of air holes around the top rim of the can.

Step 4: Drill a Meshwork of Small Air holes in the Bottom of the Small Can
Using a small drill bit create a meshwork of holes in the bottom of the small can. There should be enough for airflow but not so many that the bottom won't hold twigs and pinecones for fuel.

Step 5: Insert the Small Can into the Large Can
Nest the small can inside the large can via the hole cut out in step one. You may need to make a few small cuts with the tin snips to enlarge the hole. Use caution, to not make the hole too large or the small can will slip all the way through. If this happens, don't stress, just grab another used can and try again.
Step 6: Create a Windscreen from the Pineapple Can
The last step is creating a windscreen with the pineapple can. Use a can opener to remove the bottom. Then create a window 2" X 3" for adding fuel while cooking. An easy way to do this is to drill pilot holes at the four corners of the window and then use tin snips to cut out the for sides. Lastly, drill air holes around the bottom rim of the pineapple can. The pineapple can will sit on the wood gas stove upside down.

Step 7: Take Your New Wood Gas Stove Backpacking
To use your new wood gas backpacking stove, gather a handful of sticks and pinecones and light them inside the stove. For convenience, you may also use a small fire starter, such as a cotton ball dipped in Vaseline. The stove will take a minute to warm up, but once it does the air flowing up through the bottom will superheat to create ultra-efficient combustion and you will be enjoying your backpacking meal in no time.

Next MYOG Project to Tackle: UL Cat Food Can Backpacking Stove
You can also make a ultralight backpacking stove with a single cat food can system popular with many UL hikers and thru-hikers.


1 comment
Nice guide, thanks – it’s what I was looking for.